You've laid your pebble tile. The hard part is done. Now you're staring at a bag of grout wondering what to do next — and whether you're about to ruin everything.
Here's the thing: knowing how to grout pebble tile is genuinely different from grouting flat porcelain or ceramic. The rounded surfaces, deep gaps, and porous natural stone create challenges that most generic tutorials ignore. Get it wrong and you're looking at cracked grout lines, permanent haze baked into the stone, or grout that washes away within months.
This guide walks you through every step correctly — including the mistakes that trip up even experienced DIYers, plus which grout actually works best for natural stone.
Why Grouting Pebble Tile Is Different from Regular Tile
Flat tile has a uniform surface and consistent joint width. You apply grout, squeegee off the excess, sponge clean, done. Pebble tile works completely differently.
Natural pebbles vary in height from ¼ to ½ inch, meaning your grout joints are deep and irregular. There's significantly more grout coverage per square foot because of the irregular spacing between stones. And since most pebble tiles are natural river rock or stone, they're porous — leave the wrong grout or skip the pre-seal step and the stone absorbs the pigment permanently.
Choose the Right Grout for Pebble Tile
Sanded or Unsanded?
Always use sanded grout for pebble tile. The gaps between pebbles are typically ⅛ inch or wider, which requires sanded grout for strength and to prevent shrinkage cracking. Unsanded grout is only for joints under ⅛ inch — rare with natural pebble tile.
Best Grout Brands for Pebble Tile Shower Floors
| Grout Brand | Why It Works | Best For |
|---|---|---|
| Custom Building Products Prism | Manufacturer-recommended for pebble floors. High-performance, mildew resistant, excellent color consistency. | All pebble shower floors — fast setting so work in small sections |
| Laticrete Permacolor Select | Generous open time, cleans off natural stone easily, excellent color range. | Beginners and larger floor projects |
| Mapei Keracolor S (Sanded) | Widely available, reliable, no-frills cement grout at a great price point. | DIYers on a budget — solid first-project grout |
What Grout Color Works Best with Pebble Tile?
Sand, buff, and warm gray tones blend naturally with most river rock and multi-color pebble tiles — the most popular choice for a spa-inspired look. Charcoal or dark gray creates bold contrast on lighter pebbles. White grout shows soap scum and mineral deposits quickly in showers.
How to Grout Pebble Tile — Step by Step
Once your pebble tile has been set in thinset and cured for at least 24 hours, you're ready to grout. Work in sections of 10–15 sq ft at a time — especially on shower floors.
Pre-Seal the Pebbles — Don't Skip This
Before any grout touches your tile, apply a thin coat of penetrating stone sealer to the entire surface using a foam brush. Let it dry 30–60 minutes. This acts as a grout release — it stops porous natural stone from absorbing grout pigment, causing a permanent haze that can't be buffed off. This single step is skipped in most online tutorials and is the #1 reason pebble tile jobs end up blotchy.

Apply sealer before grouting to protect natural stone from permanent haze
Clean the Joints
Use a utility knife to remove any dried thinset sitting above the ⅛-inch mark inside the joints. Wipe all joints with a damp sponge, rinsing frequently. Don't flood the joints with water — moisture weakens the grout bond. Everything must be clean and fully dry before you begin.
Mix Your Grout
Mix sanded grout to a smooth, peanut butter consistency — thick enough to hold shape, fluid enough to press into deep gaps. Follow the manufacturer's water ratio exactly. Only mix what you can apply in 20–25 minutes — high-performance grouts like Prism set faster than standard cement grout.
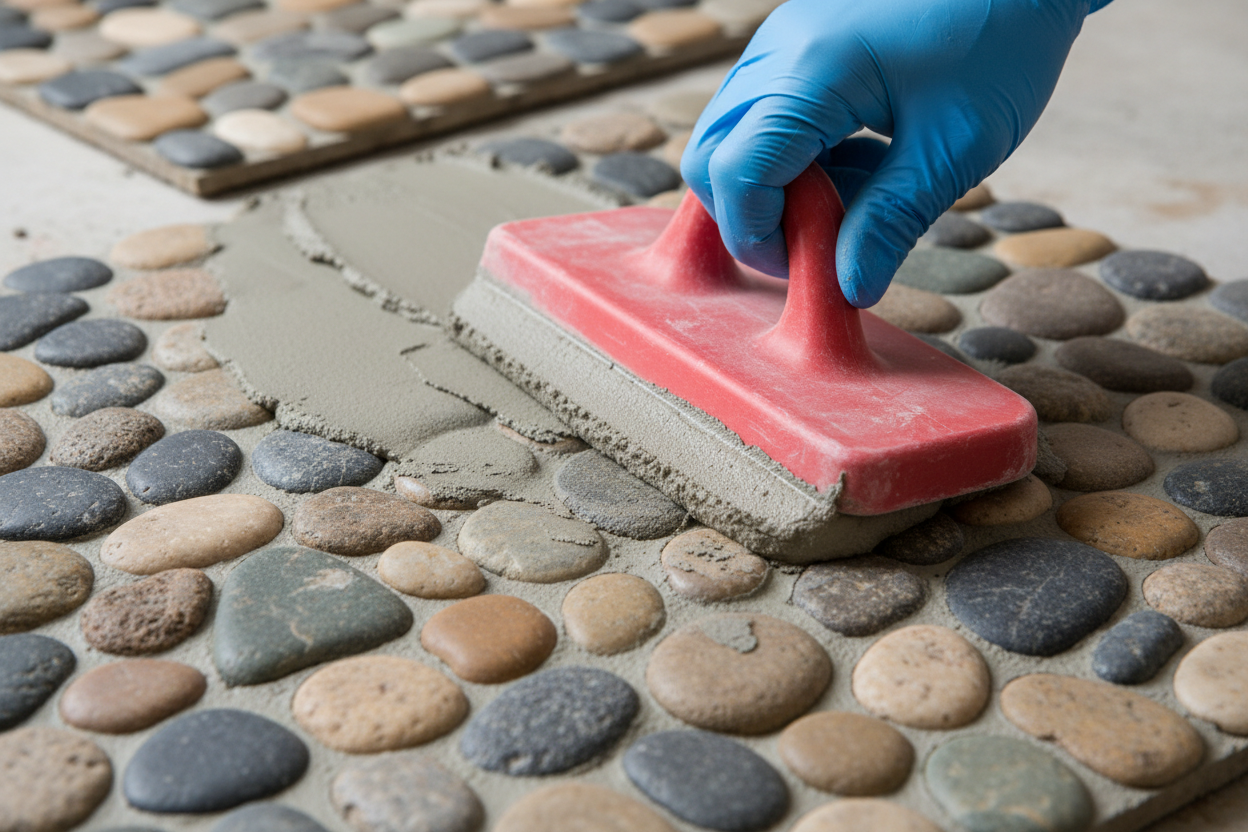
Apply the Grout
Hold your rubber grout float at a 45-degree angle and press grout firmly across the pebble surface in diagonal strokes. Unlike flat tile, you can't squeegee off the excess in one clean pass — rounded stone surfaces trap grout unpredictably. Work in 10–15 sq ft sections and pack grout carefully around the base of each pebble and near the drain. At this stage, most pebbles will be covered — that's normal.
Press grout firmly in diagonal strokes, filling all gaps between pebbles
Clean Up the Excess
Wait 15–30 minutes after application. Hold a damp — not wet — sponge completely flat against the surface and wipe in a single smooth pass. Keeping the sponge flat is critical: it skims the tops of the pebbles without dragging grout out of the joints. Rinse constantly and change bucket water often.

First sponge pass — reveal the pebble tops

Pebbles visible through grout — good progress

Use a bristle brush to recess grout between stones
Buff Off Grout Haze
Once grout dries to a matte haze (1–2 hours after cleanup), buff the surface with a dry microfiber cloth in gentle circular motions. For stubborn haze, use a commercial grout haze remover formulated for natural stone. Never use acidic formulas on pebble tile — they permanently etch the stone surface.
Grout correctly recessed — pebble tops clean, joints filled evenly
Seal After Grouting
Allow grout to cure 48–72 hours before sealing. Apply a penetrating impregnator sealer over both pebbles and grout. Wipe off any excess within 5–10 minutes — don't let it pool. Wait 24 hours before using the shower. Reseal every 12–18 months depending on use.
The finished result — evenly grouted, sealed, ready to use
The Mistakes Most DIYers Make (And How to Avoid Them)
Frequently Asked Questions
What is the best grout for pebble tile shower floors?
Sanded, high-performance cement grout is the best choice. Custom Building Products Prism is manufacturer-recommended for pebble floors. Laticrete Permacolor Select and Mapei Keracolor S are also excellent. Avoid single-component urethane grouts — they don't bond properly with the deep, irregular gaps between pebbles.
Should I use sanded or unsanded grout for pebble tile?
Always use sanded grout for pebble tile. The gaps between pebbles are typically ⅛ inch or wider, requiring sanded grout for strength and to prevent shrinkage cracking. Unsanded grout is only for joints under ⅛ inch — uncommon with natural pebble tile.
Do I need to seal pebble tile before grouting?
Yes — pre-sealing before grouting is essential for natural stone pebble tile. Without it, the porous stone absorbs grout pigment and develops a permanent haze that cannot be removed. A thin coat of penetrating sealer applied before grouting acts as a grout release and protects the stone surface.
What color grout looks best with pebble tile?
Sand, buff, and warm gray tones blend best with most natural pebble tiles and create a spa-like look. Charcoal creates striking contrast on lighter pebbles for a modern bathroom. White grout shows soap scum quickly in showers. Always test on a spare pebble sheet before grouting the full floor.
How do I remove grout haze from pebble tile?
Buff with a dry microfiber cloth in circular motions once the grout has dried. For stubborn haze, use a commercial haze remover specifically formulated for natural stone — never acidic removers, which permanently etch pebble surfaces. Pre-sealing before grouting prevents most haze problems from the start.
Ready to Start Your Pebble Tile Project?
Browse our full range of grout-ready natural, polished, sliced, and mini pebble tiles. Order samples to test grout colors on real tile before committing to your full floor.
Shop Pebble Tiles Order Free Samples