
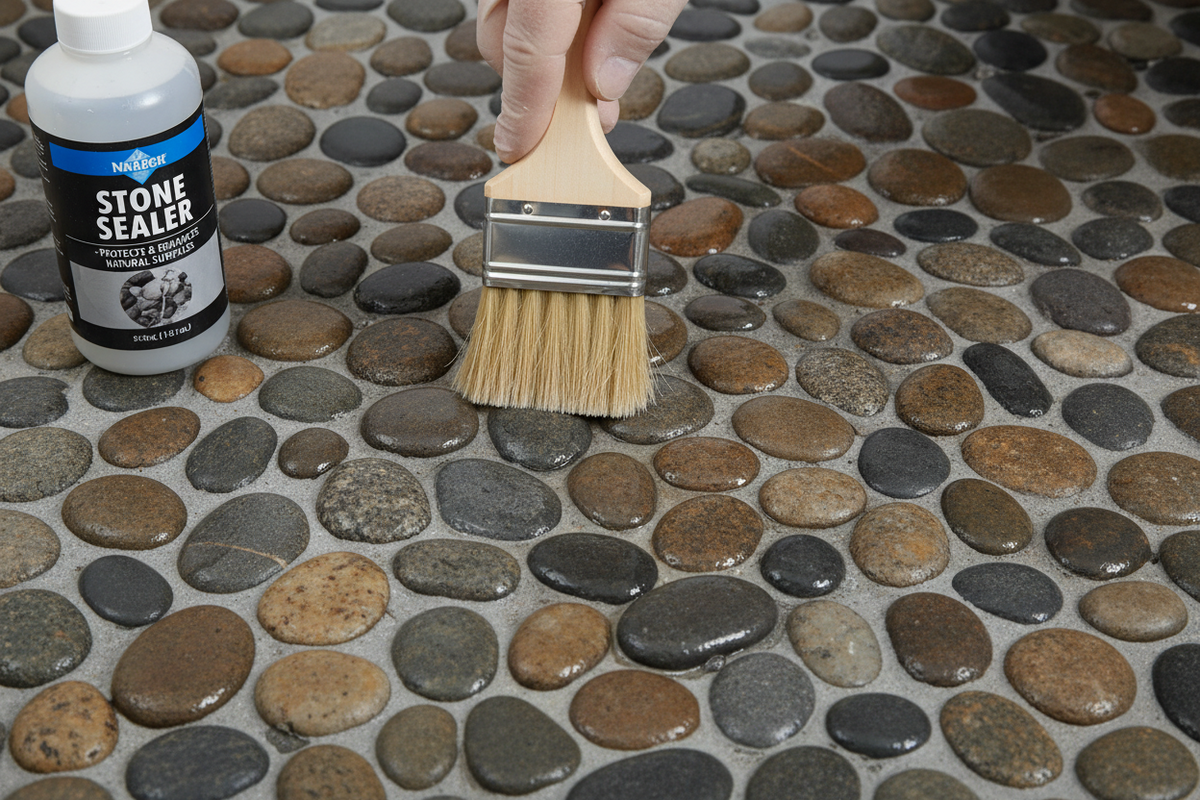
The best sealer for a pebble shower floor is a penetrating (impregnating) stone sealer rated for wet areas. It soaks into the stone instead of coating it, which protects against water and staining without leaving a slick film. Apply two coats, let each dwell 5 to 10 minutes, wipe off the excess, and allow 24 to 48 hours of cure time before using the shower.
A pebble shower floor is one of the most requested upgrades in a bathroom remodel, and for good reason. Nothing else gives you that same natural, spa-like feel underfoot. But pebble and river rock are natural stone, and natural stone is porous. Skip the sealer, or use the wrong one, and you're looking at staining, mold in the grout lines, and a floor that ages faster than it should.
This guide covers why sealing matters, how to pick the right sealer for pebble, river rock, and darker stone, the full step-by-step application process, ongoing cleaning and maintenance, and how to handle the most common problems, including mold in the joints and a sealer that hazes or peels.
Why Sealing a Pebble Shower Floor Matters
Natural stone absorbs moisture, and in a shower that means daily exposure. Left unsealed, that absorption leads to staining, mold and mildew growth in the porous stone and grout, gradual weakening of the stone surface, and grout that deteriorates faster than it should. A quality sealer creates a barrier that limits how much water the stone takes in, which protects both the pebbles and the grout holding them in place.
Beyond protection, sealing makes day-to-day maintenance genuinely easier. Soap scum and mineral deposits can't lodge as deeply into sealed stone, so routine cleaning takes less scrubbing. Most penetrating sealers also enrich the natural color and pattern of the stone without making it look artificial, and sealing measurably reduces efflorescence, the white powdery mineral film that shows up on unsealed or under-sealed stone over time.
Penetrating vs. Topical: Which Sealer Type
Penetrating (Impregnating)
RECOMMENDEDSoaks into the stone rather than sitting on top. Preserves natural texture, lets the stone breathe, and won't create a slick film in a shower that's wet every day.
Topical (Film-Forming)
USE WITH CARESits on the surface and can look glossy, but is more prone to peeling under constant moisture. Not the first choice for a shower floor used daily.
Water-Based
EASIEST DIYLower odor, simpler application, and generally the better fit for a first-time DIY sealing job.
Solvent-Based
EXPERIENCED USERSOften stronger stain resistance and longevity, but needs more ventilation and careful handling during application.
Best Sealer Approach by Stone Type
PRO TIP — WANT RICHER COLOR OR NONE AT ALL
Most penetrating sealers cause slight darkening. If you want zero color change, look for a product labeled "natural look" and confirm with a patch test in an inconspicuous corner first. If you want a deeper, richer tone instead, choose a color-enhancing impregnator on purpose rather than being surprised by the darkening after the fact.
Preparing the Floor Before You Seal
For a new installation, let the thinset and grout cure fully before sealing, typically 48 to 72 hours, following your product's specific instructions. For an existing floor, deep clean with a pH-neutral stone cleaner first, never anything acidic. Fix any loose pebbles, cracked or low grout, and missing joints before sealing, and if there's an old topical sealer already on the floor, strip it with a stone-safe stripper rather than sealing over it. Let the floor dry completely, at least 24 hours, so no moisture gets trapped underneath the new sealer.
Step-by-Step: How to Seal a Pebble Shower Floor
- Gather your materials: penetrating sealer, lint-free applicator pads or microfiber cloths, a small brush for tight spots, gloves, goggles, painter's tape, and ventilation.
- Protect nearby surfaces by masking walls, glass, drains, and trim so only the stone and grout get treated.
- Test in a discreet corner first to preview any color change and confirm the product is compatible with your stone.
- Apply the first coat, working in small sections and saturating both the pebbles and the grout lines evenly. Use the brush to reach crevices and avoid letting sealer puddle.
- Let it dwell, usually 5 to 10 minutes, so the sealer has time to penetrate before you move on.
- Wipe off the excess before it dries on the surface to prevent a hazy film from forming.
- Add a second coat after the recommended dry time, often 1 to 2 hours. Most shower floors need two coats for full protection.
- Buff the final coat with a clean, dry cloth once it has flashed off, for an even, natural sheen.
- Let it cure fully, commonly 24 to 48 hours, before the floor sees any water.
QUICK-SCAN SEALING CHECKLIST
- Floor cleaned, repaired, and fully dry (24+ hrs)
- Nearby surfaces masked off
- Sealer tested in a discreet corner
- First coat applied and wiped before drying
- Second coat applied after dwell + dry time
- Final buff completed
- 24–48 hrs cure time before first shower use
Cleaning and Maintaining a Sealed Pebble Shower Floor
Use a pH-neutral, stone-safe cleaner for regular upkeep. Avoid vinegar, bleach, and standard acidic bathroom sprays, all of which can etch the stone and break down the sealer over time. After each shower, a quick squeegee or towel-dry reduces mineral buildup, which matters more on pebble than flat tile since rounded stones hide deposits between the joints. Every few months, do a deeper clean with a non-acidic, stone-safe scale remover to clear soap film and hard-water haze, then rinse and dry thoroughly.
Water no longer beads on the surface, or dark spots linger after the floor gets wet. That's typically every 3 to 5 years, depending on shower use, water hardness, and the cleaners used.
Dealing with Mold on a Pebble Shower Floor
Mold and mildew tend to show up in the grout joints between pebbles rather than on the stone itself, since grout is more porous and the joints trap moisture longer after a shower. If mold has already appeared, clean the affected grout with a non-acidic, mold-rated, stone-safe cleaner rather than bleach, which can discolor grout and degrade the sealer. Improve bathroom ventilation with a fan or cracked window after each shower, since trapped humidity is the biggest driver of recurring mold regardless of how well the floor was sealed. For a floor that keeps getting mold despite regular cleaning, an antimicrobial additive in your next sealer application can help inhibit regrowth in the grout lines specifically.
Bleach and other harsh disinfectants can strip a penetrating sealer and discolor natural stone. If mold keeps returning, the fix is better ventilation and a mold-rated stone-safe cleaner, not stronger chemicals.
Grout for Pebble Shower Floors
Sanded cement grout or high-performance cement grout is the standard choice for pebble shower floors, since pebble joints tend to run wide enough to take advantage of sanded grout's strengths. Epoxy grout offers noticeably better stain resistance and holds up longer in a constantly wet shower floor, but it requires more experienced installation and a shorter working time. Whichever you choose, make sure the joints are packed fully and tooled smooth, since gaps and low spots are where dirt and moisture collect first.
Troubleshooting Common Sealing Problems
Hazy appearance after sealing
Fix: Usually dried residue. Re-buff with a dry cloth, or lightly reapply and immediately wipe off to reactivate it.
Streaks or uneven sheen
Fix: You didn't wipe off the excess in time on the first pass. Apply a thin coat and buff evenly this time.
Peeling or flaking
Fix: Strip it, deep clean, fully dry, and reseal with a penetrating product instead of a topical one.
Persistent stains
Fix: Spot-treat with a stone-safe poultice, rinse, dry fully, then reseal just that area.
Slippery after sealing
Fix: Confirm you used a penetrating (not topical) sealer, or add a traction additive if staying topical.
Pebble Shower Floor: Pros and Cons at a Glance
PROS
- Natural, spa-like look and feel underfoot
- Excellent traction, even wet
- Hides slope lines toward the drain nicely
CONS
- More grout lines mean more upkeep
- Can feel uneven if poorly installed
- Requires sealing on a regular schedule to stay protected
Frequently Asked Questions
What's the best sealer for a pebble shower floor?
A penetrating (impregnating) stone sealer rated for wet areas. Choose a color-enhancing version for richer, wet-look color, or a natural-look version for no visible color change.
How do you seal a pebble shower floor?
Clean and fully dry the floor, apply a penetrating sealer in small sections, let it dwell 5 to 10 minutes, wipe off the excess, apply a second coat after the recommended dry time, buff, and let it cure 24 to 48 hours before using the shower.
How do you clean and seal a pebble shower floor?
Deep clean first with a pH-neutral stone cleaner, fix any loose pebbles or grout issues, let the floor dry completely for at least 24 hours, then apply the sealer. Cleaning and sealing are sequential steps, not a combined product.
What's the best cleaner for a pebble shower floor?
A pH-neutral, stone-safe cleaner for everyday use. Avoid vinegar, bleach, and standard acidic bathroom sprays, which can etch the stone and break down the sealer over time.
Is there a different sealer for a river rock shower floor?
River rock generally behaves like other natural pebbles. Focus on a high-quality penetrating sealer with strong water and stain resistance, and add a color enhancer only if you want the deeper "wet look."
How do you clean mold from a pebble shower floor?
Clean the affected grout with a non-acidic, mold-rated stone-safe cleaner rather than bleach. Improve ventilation after each shower to prevent recurrence, and consider an antimicrobial additive in your next sealer application if mold keeps coming back.
How often should you seal a pebble shower floor?
Typically every 3 to 5 years, though the exact window depends on how much the shower is used, water hardness, and which cleaners have been used. The clearest sign it's time to reseal is when water no longer beads on the surface.
What grout works best for a pebble shower floor?
Sanded cement grout or a high-performance cement grout is standard. Epoxy grout offers better stain resistance for a constantly wet floor but needs more experienced installation.
Should you seal pebble tile before or after grouting?
Seal the tile itself before grouting if you want to make grout haze easier to wipe off the stone, then seal the whole floor again, including the grout, after the grout has fully cured. Sealing only after grouting also works and is the more common approach for a straightforward DIY job, since it protects both the stone and grout together in one pass.
What do you do about a loose pebble on a shower floor?
Remove any loose debris, apply fresh thinset or tile adhesive rated for wet areas underneath the pebble, press it back into place, and let it cure fully before regrouting around it. Address loose pebbles before sealing, since sealing over a loose or unstable pebble doesn't fix the underlying bond issue.
Conclusion
Sealing a pebble shower floor is the single step that determines whether it stays beautiful for years or starts showing wear within months. With the right penetrating sealer, cproperprep, and a straightforward reseal schedule, a pebble or river rock floor hcan handledaily showers while keeping the natural texture that made you want it in the first place.
If you're planning a pebble shower floor or need to reseal an existing one, Pebble Tile Shop carries natural pebble and river rock tile alongside a full line of stone sealers and cleaners, s so thatu can source the tile and the maintenance products in one place.
Ready to protect your pebble shower floor? Shop our sealers and pebble tile collection.
Shop Now

Leave a comment
This site is protected by hCaptcha and the hCaptcha Privacy Policy and Terms of Service apply.